Google Docs is fast becoming the word processor of choice for many. This may be because it is easily accessible anywhere as long as you are connected to the internet. Not only that, it’s cloud-based feature allows you to access your documents using other computers, which means you do not even need to bring the files with you. Google Docs is packed with features that solve the problems and simple annoyances that you find in old word processors. Real-time save, version history that allows you to go back to your previously edited document should you want to revert and the collaboration function that makes writing a document to not only be a one-person job.
Machine-learning powered Grammar Checker
Sometime early 2019 Google has added their machine-learning powered grammar checker. This was announced last 2018 in the Cloud Next Event. This feature uses machine translation in order for the grammar checker to understand complex grammar rules. Unlike in the first versions of the grammar checkers where words and sentences are compared with a dictionary, this new grammar checker from Google docs is capable of catching grammar issues depending on the different regions in the world.
How to Activate Grammar Checker in Google
There are two ways on how to use your grammar checker on Google. However, we would require you to activate the feature first if it is not yet activated. Here are the steps on how to activate your Grammar checker as well as your spelling checker on Google Docs:
- Open a new document or an existing document on Google Docs.
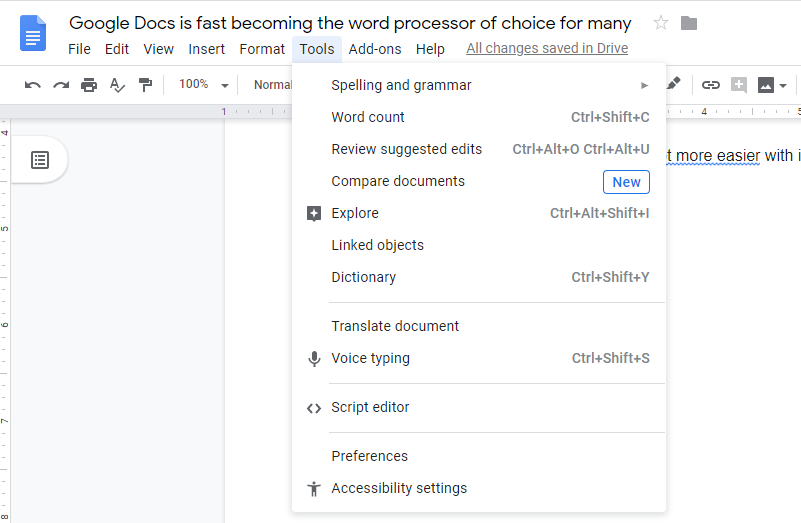
- Go to the menu bar (top-most part of the Google Docs window) and click on Tools
- You should see the Spelling and Grammar tab in the dropdown button.
- Hover your mouse pointer over the arrow and it will show you another tab with several options
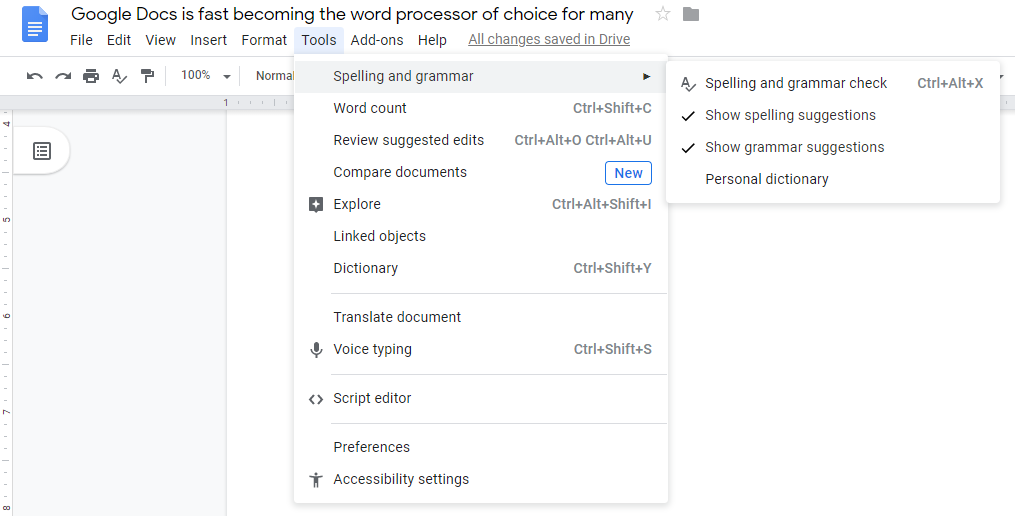
- Make sure there is a checkmark in the spelling and grammar check option, as well as in the “show spelling suggestions” and “show grammar suggestions”. If there are none, click on each option to activate each option.
How To Check for Spelling and Grammar Errors in Google Docs
If the show spelling and the show grammar suggestions are activated, then the document will locate and highlight any known errors in spelling or grammar. The spelling error will have a red underline while the grammar error or issue will have a blue underline. Google docs will provide suggestions on what could be the best replacement for those errors. Should you want to activate the spelling and grammar check manually you can highlight the sentence right click and choose spelling and grammar checker in the options, or you can use the keyboard shortcut Ctrl+Alt+X.

Google Docs has really made writing articles a lot easier with its Machine learning-powered Grammar and Spelling checker. So start writing your masterpiece with ease using Google Docs.