In this Blog Post:
Here’s your guide on how to change name in Facebook Classic, New Facebook, Facebook App, and Facebook Lite.

Want to update your Facebook name, especially your family name, into your spouse’s surname? Or maybe you just want to change your Facebook name since you’ve used a funny nickname several years ago? Or simply would want to add a middle name because there are other accounts in the platform which have the exact same name as you?
There truly are a variety of reasons why you might want to change your name in your Facebook account, and whatever your reason may be, changing your name on Facebook is possible and can be done in different ways.
Ways on How to Change Name in Facebook
Here is the variety of methods you can use in changing your name in Facebook. Just follow the step-by-step process that is suited to your device and you’ll get to make the change in no time.
1. Change Name in Classic Facebook
STEP 1
Before anything else, go to the Facebook website and login into your account with your computer.
STEP 2
Click on the small arrow pointing down located by the upper right corner of your screen. A list of options will dropdown. Select Settings.
STEP 3
You will be directed right away to the General Account Settings where there will be more choice. On that page, click on Name.
STEP 4
After clicking Name, the question “How to change name in Facebook” will already be a lot easier to answer. From this page, you will be able to change your First, Middle, and Last name by simply entering the name you prefer.
Other than that, you can also add Other Names here such as your Nickname, Maiden Name, Alternate Spelling, Married Name, Father’s Name, Birth Name, Former Name, Name with Title, and others.
STEP 5
Once you’ve entered the changes in your Facebook name or once you’ve already added the name you wanted, click Review Change.
STEP 6
Preview your new Facebook name and choose how your name will appear on your profile. Then, if you’re already happy with the new name, enter your password and click Save Changes.
Did you follow? If so, congratulations! You’ve done it.
2. How to Change Name in New Facebook
STEP 1
Open the Facebook website on your computer and log in to your Facebook account.
STEP 2
Once logged in, see the upper right corner of your screen. Click on the small arrow pointing down to reveal choices. Select Settings & Privacy then click on Settings.
STEP 3
Click Name. Then enter your name. After doing so, click Review Change. Take time to review the change you’re about to save.
STEP 4
Lastly, type in your Facebook password and click Save Changes. There you go, as easy that!
3. Change Your Name in Facebook App
Of course, you can also change your Facebook name through the mobile Facebook App. Here’s the step-by-step process if you would rather make the change using the Facebook App.
How to Change Name in Facebook App Through Settings
STEP 1
Make sure that your mobile device has a Facebook App. If it doesn’t, download the app first from either Google Play or App Store. It is free to download and is also free to use. All you need to have is an internet connection to proceed with the download.
STEP 2
Open the Facebook app and log in to your Facebook account.
STEP 3
See the three horizontal lines located on the upper right of your screen. Tap the horizontal line icon and after doing so scroll to the bottom of the page.
STEP 4
Tap Settings and Privacy then tap Settings. After doing so, you will be in a page which is divided in different categories such as Account Setting, Security, Privacy, Your Facebook Information, and the like.
STEP 5
From there, tap Personal Information under the Account Setting Category.
STEP 6
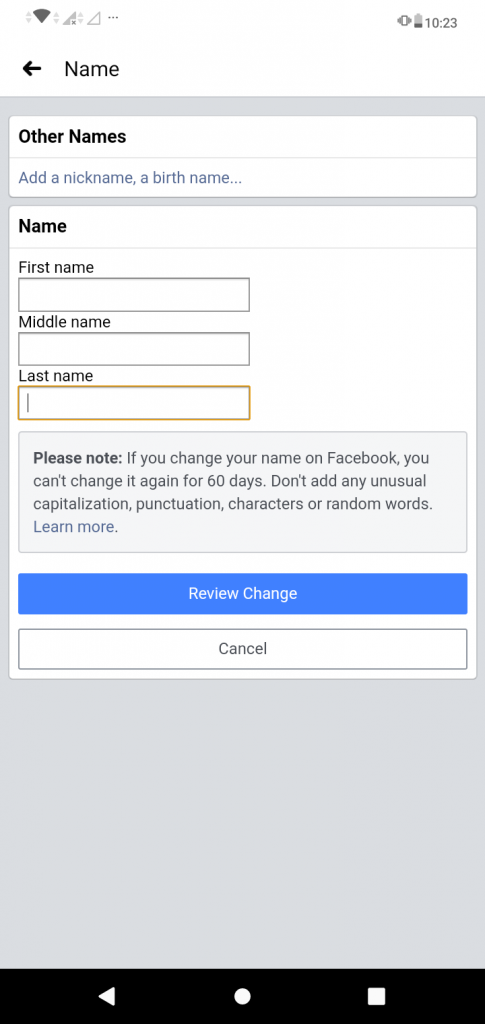
Once in the Personal Information page, tap Name and you will be directed to the page where you can change your name.
STEP 7
On the Name page you can choose to either or both change your actual name in Facebook and/or add Other Names.
STEP 8
Just the same as changing your Facebook name via your computer and the platform’s website, you have to tap Review Change before you can save the changes.
STEP 9
On the Preview Your New Name page, choose how you would like your name to appear then enter your password and tap Save Changes.
Add Other Name in Facebook App Through Profile
If you’d rather change or add Other Names rather than actually cahnging your Facebook name, going to Settings isn’t the only way to do it. Here’s the other method which you might find more convenient.
STEP 1
Get a Facebook App on your mobile device via installing it from Google Play or App Store. Open the Facebook app and log in to your account.
STEP 2
Tap on the three horizontal lines icon on the upper right corner of your screen. It will reveal the MENU and from there, tap See your Profile.
STEP 3
Once already on your Facebook profile, see the three dots icon beside the Add Story and tap it.
STEP 4
You will be directed to your Profile Setting page after doing so. On that page tap Edit Profile.
STEP 5
Scroll to the bottom of the Edit Profile page and select Edit Your About Info.
STEP 6
You will be on the About page. On this page there will be a variety of categories such as Work, Education, Place Lived, Contact Info, Basic Info, and the like.
Scroll further down until you find the category called Other Names. Tap Add Other Name.
STEP 7
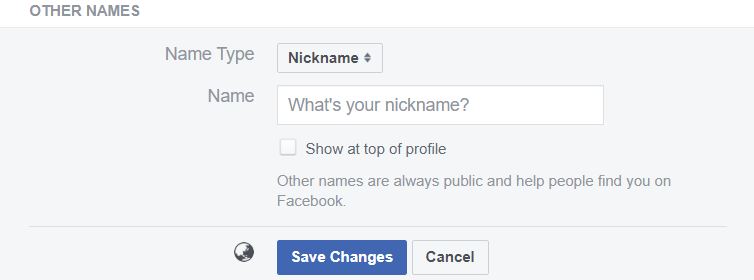
Choose the Name Type suited to the nickname you’ll add and enter the name below the type. Tap the empty circle below the nickname you’ve entered if you want it to show at the top of your profile.
STEP 8
Save your other name by tapping, apparently, tapping Save.
4. How to Change Name in Facebook Lite
the Facebook App isn’t the only “Facebook App” in the Google Play a which is owned by the Facebook company itself.
The other one is called Facebook Lite. It is the Version of Facebook that uses less data and it works in all network conditions. And guess what, it can be used to change your Facebook name as well.
The process of changing your name is almost the same as changing in using the original Facebook App, but here’s the step-by-step process anyway:
STEP 1
Install Facebook Lite on your mobile device if you wish to change your Facebook name using this app instead.
STEP 2
Open Facebook Lite and log in to your Facebook account.
STEP 3
Once the app is already logged in, tap the top right of your screen.
STEP 4
Scroll down and tap Settings then the Personal Information.
STEP 5
Tap the word Edit next to your name.
STEP 6
Enter your new Facebook name and tap Review Change.
STEP 7
Enter your password and tap Save Changes.
Other Things to Know When Changing Name in Facebook

According to Facebook, always knowing who you’re connecting with helps keep you and the rest of our community safe from impersonation, scams and phishing.
Thus, people usually use the name they go by in everyday life within the platform.
In line with this, Facebook determines whether or not the new name you’re about to use will be allowed though their Name Policy.
Facebook Name Policy
Your new Facebook name shouldn’t include anything from the list below.
- Symbols, numbers, unusual capitalization, repeating characters or punctuation
- Characters from multiple languages
- Titles of any kind, such as professional or religious
- Words or phrases in place of a name
- Any kind of offensive or suggestive words
For those who Have Trouble Changing Facebook Name
For those who are having trouble in changing their Facebook name, one of these could be the reason why:
- Your name doesn’t follow Facebook’s Name Policy.
- You changed your name in the last 60 days, or you tried to change it too frequently.
- You were previously asked to confirm your name on Facebook.
- Your name doesn’t match the name that appears on an item from Facebook’s ID List.
So how to change name in Facebook for those who are having trouble doing so after following the steps provided above?
If you’re still having trouble changing your Facebook name after following the process and the name policy, you can fill out a form provided by Facebook to request a name change and confirm your name. Click here for the said form.
About Other Names
Now that you know how to use the Other Names feature, there’s one more thing to note about it. Other Names are always public and it help people find you on Facebook. That’s about it.
For More TechToTips
Looking for more content like this one? See more TechToTips by exploring our TechToGraphy website and by liking or following our official TechToGraphy Facebook Page, Twitter, and Instagram account.
SOURCE
For more information, see our complete guide on How to Use Zoom, a Comprehensive Guide for Starters.