In this Blog Post:
A step-by-step guide on how to screenshot in laptop or desktop computer with Windows 10, whether it be the entire screen or just selected parts.
These days taking screenshot is one of the easiest and simplest ways to save a copy of whatever is displayed on your screen whether you’re using a mobile device, a laptop, or a desktop computer.
So how can you take screenshots or capture your screen exactly using your laptop or computer with Windows 10? You’ll be surprised on how easy it could be.
You can do it in several different ways and you can choose the method which you think is the most convenient for your need. Here’s how you can do it.
Steps on How to Screenshot in Laptop or Computer with Windows 10
Here are some of the many ways you can try to screenshot or screen capture or print screen using your laptop or desktop computer with Windows 10.
How to Screenshot in Laptop or Computer: Snipping Tool
STEP 1: Go to the Start Menu
The first thing you should do is to find the tool. To do so, go to the Start button and type the words snipping tool in the search box.
STEP 2: Open Snipping Tool
Simply select Snipping Tool from the list of results.
STEP 3: Select Mode
Once you’ve already opened the tool, click mode and choose from Free-form Snip, Rectangular Snip, Window Snip, Full-Screen Snip.
But you’re probably asking, what are the differences between these four modes? Well, here the answer.
Free-form Snip
With the Free-form Snip mode, as its name goes, will let you draw a free-form shape around an object.
So it you want to snip in a circle or even in heart shape, you can have fun doing so. There’s no guarantee the the shapes will turn out perfect though.
Rectangular Snip
Unlike with the Free-form Snip, with Rectangular Snip mode you can only form a rectangle by dragging the cursor around the object you would like to take screenshot of.
Compared to Free-form Snip however, Rectangular Snip is easier to use since no matter how you drag the mouse, you’ll always end up making a perfect rectangle. Thus, crooked shape will never become one of your concerns.
Window Snip
On the other hand, with Window Snip, you can simply select a window, a dialog box for example, which you want to capture.
Full-screen Snip
Of all these modes, Full-screen Snip is the simplest and the easiest to use. The moment you select it, it will capture your entire screen right away.
STEP 4: Click New
If you’ve chosen either Rectangular Snip, Free-form Snip, or Window Snip, the next step for you is to click New.
STEP 5: Capture Part of the Screen
Once you’ve clicked New, if you have chosen either Rectangular Snip and Free-form Snip, you will be able to capture a portion of your screen, regardless of how big or small portion it may be.
You can do it by dragging your mouse around the object you would like to capture. By releasing it, it will right away copy the snip to the Snipping Tool window where you make changes.
If you have selected the Window Snip instead, all you have to do is to click the window you would like to take screenshot of, and just the same, it will be copied to the Snipping Tool window where you make changes.
STEP 6: Save or Send or Print
Once already on the Snipping Tool window, click File to either save, send, or print the screenshot you have captured.
That’s how to screenshot in laptop or desktop computer with Windows 10 using the Snipping Tool.
How to Screenshot in Laptop or Computer: Snip & Sketch
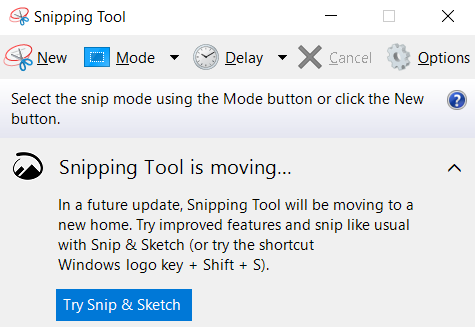
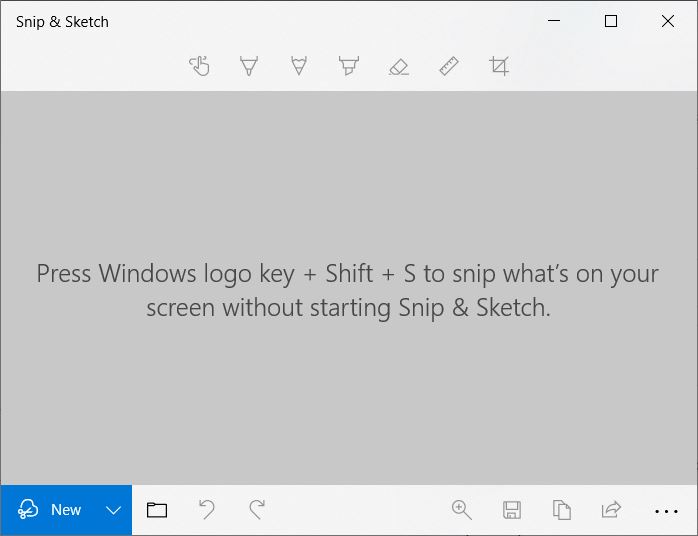
Aside from the Snipping Tool, Windows 10 has another screenshot app, the Snip & Sketch. Whenever you open the Snipping Tool you will see an invitation to Snip & Sketch saying, “Snipping Tool is moving…”
Check out the first photo in this blog to see the Snip & Sketch invitation, located just below the Snipping Tool features.
Here’s how you can use the power of Snip & Sketch:
STEP 1: Open Snip & Sketch
You can open Snip & Sketch by opening the Snipping Tool and clicking Try Snip & Sketch icon at the bottom left of the window.
Another way to open it is by typing the words Snip & Sketch in the search box at the Start button and clicking the tool once it shows up in the list of results.
STEP 2: Click New
Click New. Upon doing so, your screen will turn dark and that’s when you can already start capturing either your entire screen or at least a small portion.
STEP 3: Set the Type of Snip
By default, you will be able to make a Rectangular Snip once you’ve clicked New. But if you would like to change that, you can set it before dragging capturing your screen.
When your screen goes dark, notice the icons that will pop out at the upper middle portion of your screen. These are the icons corresponding the Rectangular Snip, Freeform Snip, Window Snip, and Fullscreen Snip respectively.
These types of snips work just like the ones of the Snipping Tool, so if you’re familiar with those, then you’ll get the hang of these ones in no time.
STEP 4: Snip and Sketch
You can now start to capture your screen the way you want to. After capturing your screen, make changes as you wish. Sketch on it, highlight parts of it, or even cop it without exiting the tool.
STEP 5: Save or Copy or Share
Once you’re satisfied with what you have captured, you can already save it, copy it, share it, or print it. You can find these options at the bottom right portion of the window.
That’s how to screenshot in laptop or desktop computer with Windows 10 using Snip & Sketch.
BONUS: Use the Shortcut
That’s not the only way you can use the Snip & Sketch tool. You can also access it without opening the app itself. It can be done by simply holding Windows key + Shift + S on your keyboard.
By doing so, the screen will darken and the icons for the Rectangular Snip, Freeform Snip, Window Snip, and Fullscreen Snip will appear at the uper portion of your screen.
Thus, letting you capture your screen the way you want to right away.
How to Screenshot in Laptop or Computer: PrtScn
Among all the ways to screenshot which made it to this tutorial, this one is by far the easiest way to do it. This method will let you copy the entire image on your screen.
STEP 1: Locate PrtScn
The Print Screen (PrtScn) key is usually located at the upper right portion on your keyboard. The text on the key may also be PrtSc, PrtScn, or PrntScrn.
STEP 2: Organize Your Screen
Since Print Screen will let you copy your entire screen, make sure to open everything you want to copy and organize them the way you prefer.
STEP 3: PrtScn
Then simply press Print Screen (PrtScn) key. This will copy whatever is on your screen.
STEP 4: Paste
Open any program or application on your laptop or computer, for example the Microsoft Word, then Paste (CTRL+V) the image.
That’s how to screenshot in laptop or desktop computer with Windows 10 all thanks to the PrtScn key.
How to Screenshot in Laptop or Computer: Alt + PrtScn
The Alt + PrtScn is the second easiest way to capture your screen next to PrtScn. This method will copy only the image of the active window.
This pretty useful if you’re working with many widows at the time while only planning to capture the active one.
STEP 1: Locate PrtScn
The Print Screen (PrtScn) key is usually located at the upper right portion on your keyboard. The text on the key may also be PrtSc, PrtScn, or PrntScrn.
STEP 2: Click a Window
Click the window you would like to copy.
STEP 3: Alt + PrtScn
Then simply press the Alt + PrtScn key on your keyboard.
STEP 4: Paste
Open any program or application on your laptop or computer, for example the Microsoft Word, then Paste (CTRL+V) the image.
That’s how to screenshot in laptop or desktop computer with Windows 10 using Alt + PrtScn.
How to Screenshot in Laptop or Computer: Windows key + PrtScn
This method, just like when you’re just using PrtScn, will let you copy the entire image on your screen.
The difference however is that, aside from your screen will be copied, it will also be save instantly. Here’s how it works.
STEP 1: Locate PrtScn
The Print Screen (PrtScn) key is usually located at the upper right portion on your keyboard. The text on the key may also be PrtSc, PrtScn, or PrntScrn.
STEP 2: Windows key + PrtScn
Press the Windows key + PrtScn keys on your keyboard. Upon doing so, your screen with briefly darken as if it just blinked. No need to worry though, that’s normal.
STEP 3: Paste
This step is optional, since your screen has already been saved to your computer after pressing Windows key + PrtScn.
However, if you still want to paste it somewhere, just open any program or app wherein you can Paste (CTRL+V) it.
STEP 4: Find the Captured Image
You can find the picture or the screenshots in the Picture folder of your laptop or computer under the subfolder Screenshots.
That’s how to screenshot in laptop or desktop computer with Windows 10 using Windows key + PrtScn.
That’s How You Do It!
Did you find this guide useful? Share your thoughts with us in the comment section below.
For More TechTo Tips
Looking for more tips and tricks on tech, the internet, gaming, and even photography? TechToGraphy has loads more!
Feel free to explore our TechToGraphy website and to like or follow our official TechToGraphy Twitter and Facebook page to see the rest of our content.
SOURCE
Microsoft|Copy Window or Screen, Microsoft|Snipping Tool, Business Insider
For more information, see our complete guide on How to Use Zoom, a Comprehensive Guide for Starters.