In this Blog Post:
Here’s a step-by-step guide for starters on how to use Zoom.

Still trying to figure out which among all the video conferencing apps out there to use for your virtual meetings? Well, you might want to try the most popular ones first such as Google Meet and Zoom.
If you are having second thoughts on trying because you aren’t yet so familiar with the platform, let this comprehensive guide teach you almost everything you need to know. You can start by getting to know what Zoom actually is.
What is Zoom
Zoom is an enterprise video conferencing platform which can also be used for real-time messaging and content sharing. This tool helps businesses, schools, and any other organizations across the world in bring their teams together.
Since Zoom makes it possible for everyone to conduct video/voice calls, share content, and even simply chat through across mobile devices and desktops, those who are working remotely or having online classes may find convenience in using the platform.
Ready to start exploring what Zoom is capable of? If so, follow these steps below on how to use Zoom on your mobile devices and on your desktop computer.
How to Use Zoom in Mobile Devices

Planning to use Zoom on your mobile devices? Then, before jumping into the first step, you have to make sure first that you have the Zoom app in your phone or tablet.
If you don’t have it yet, you can download the Zoom app (ZOOM Cloud Meetings) for free from either Google Play or App Store. Are you ready for the first step? Let’s proceed!
How to Get Started with Zoom using an Android Device

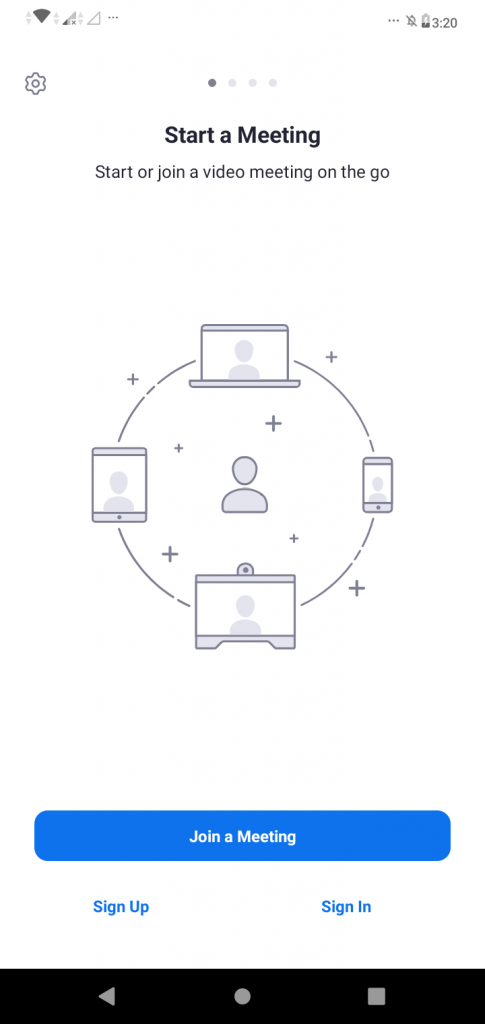
STEP 1: Open the Zoom App and Sign In
Open the Zoom app on your mobile device. After doing so, you will be welcomed by three (3) choices – Join a Meeting, Sign Up, and Sign In.
STEP 2: Sign Up or Sign In
If you don’t have a Zoom account yet, select tap Sign Up. But if you already have an account or at least would be comfortable signing in using either your SSO, Google, or Facebook account, then tap Sign In.
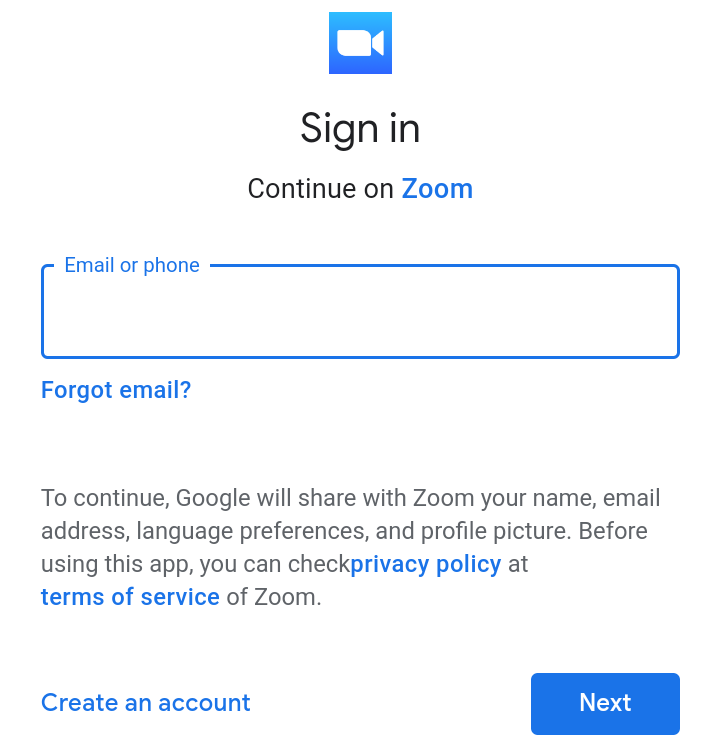
If you have chosen to Sign In using your Google account, you can continue to Zoom by typing in your email address and of course, your password.
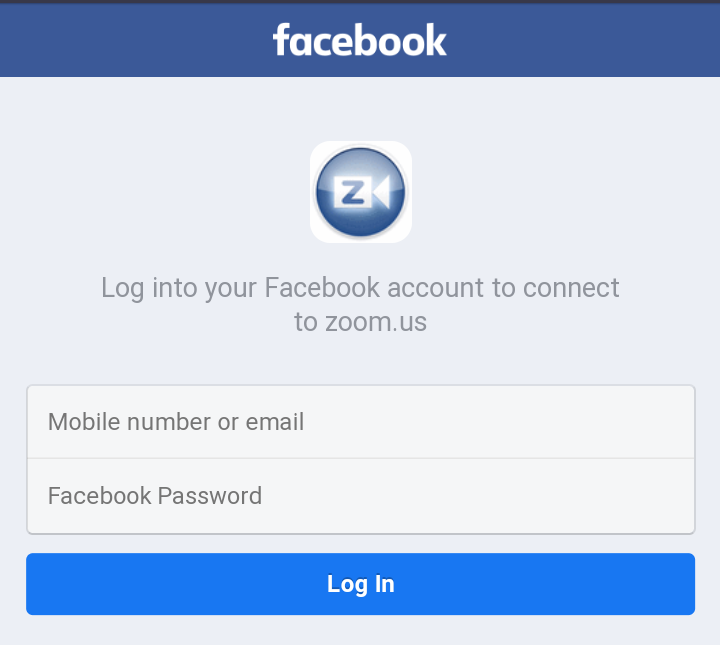
On the other hand, if you have chosen to proceed with you Facebook account, you have to Log In with your email and password just the same.
While with SSO, you will be asked to enter your company domain instead to be able to continue.
STEP 3: Explore Your Dashboard
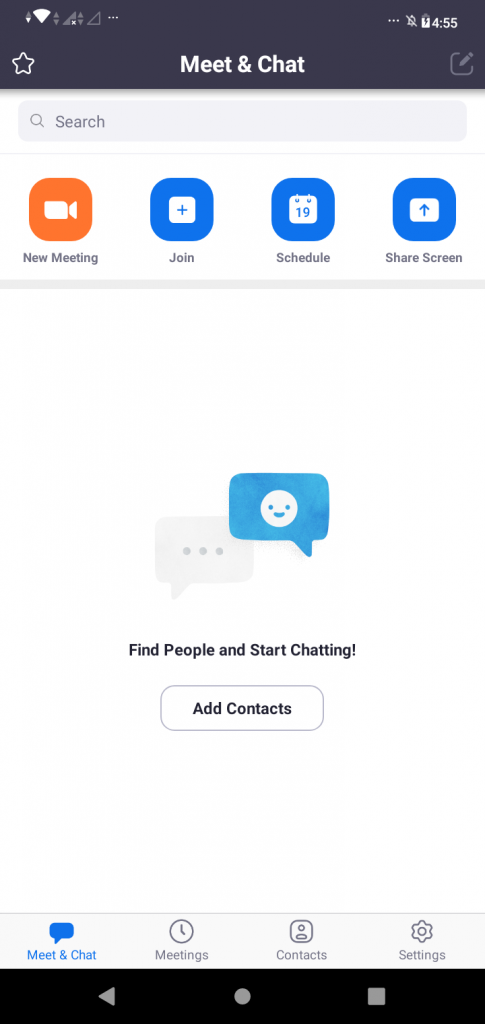
Once signed in, you be directed right away to your Zoom dashboard, on the Meet & Chat page. From here, you can already familiarize yourself with the icons and their corresponding features.
That’s how you can start using the app.
How to Start Meeting using an Android Device
STEP 1: Open the Zoom App
Make sure that your mobile device is connected to an internet connection, then open the app. By doing so, the Meet & Chat page will be welcoming you.
STEP 2: Tap New Meeting
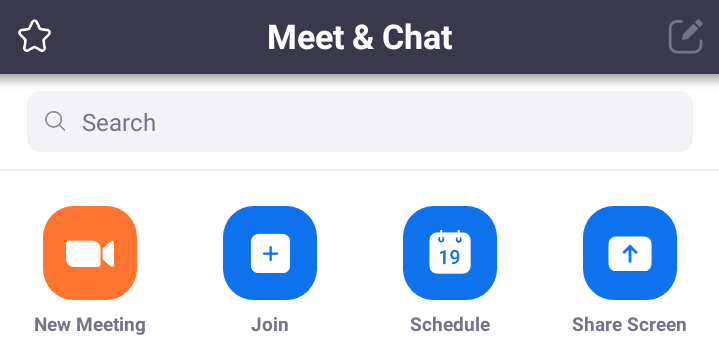
On the Meet & Chat page, you will see five options – the New Meeting, Join, Schedule, Share Screen, and Add Contacts.
Obviously, to be able to host a meeting, tap the the New Meeting icon. It is the first icon from the upper left portion of your screen.
After doing so, determine if you want to start a meeting with your video on or off and whether or not you would like to use your Personal Meeting ID (PMI).
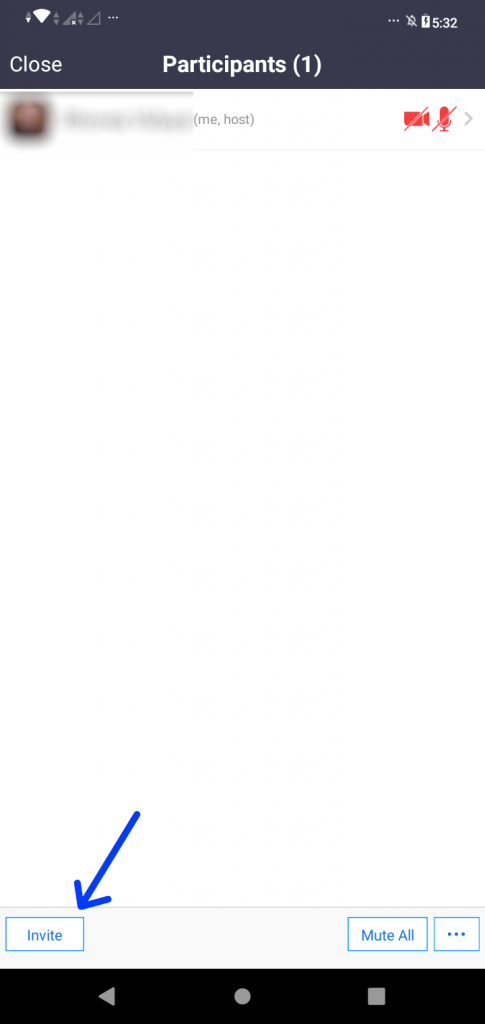
STEP 3: Invite Participants

See the five icons on the bottom of your screen – Mute/Unmute, Start Video, Share, Participants, and More. Select Participants. After doing so, see the lower left corner of your screen for the Invite icon, then tap it.
Once you tap invite, more options will pop out. Choose whichever you think would be more convenient for you.
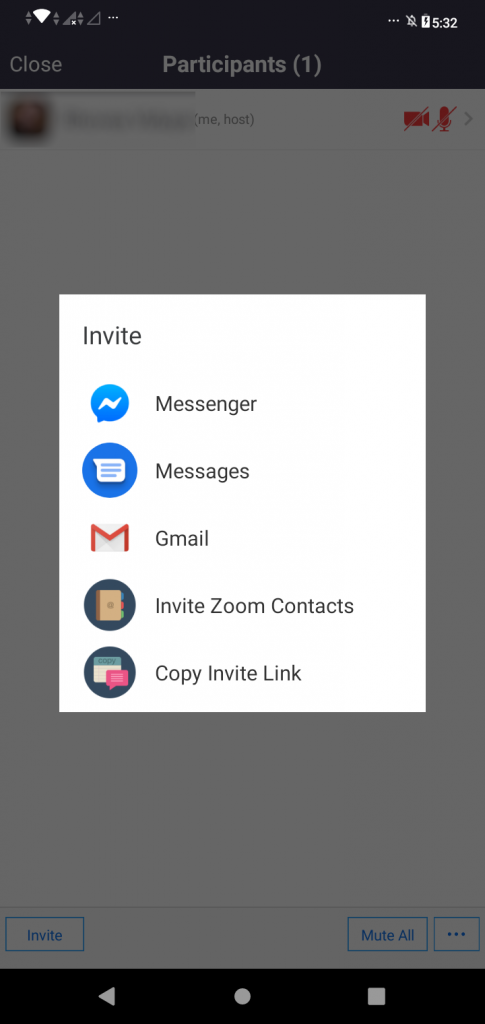
You can send an invite (Zoom meeting link) via Messenger, Messages, Gmail, and Zoom Contacts. But you can also choose to copy the invite link and send it via any other messaging platform you have.
STEP 4: Leave/End Meeting
You can end or leave the meeting by tapping your screen, and tapping End by the upper right corner of your screen. Choose from End Meeting for All or Leave Meeting.
That’s it! You’ve successfully started a meeting using Zoom!
How to Join a Meeting using an Android Device
Method 1
STEP 1: Open the Zoom App
Make sure that your mobile device is connected on the internet. If you already have the app simply open it. If not, download the app first.
STEP 2: Join a Meeting
Once you’ve already opened the app, you can join a meeting without signing in by tapping Join a Meeting.
On the other hand, if you are signed in, tap the Join icon located at the upper portion of your screen on the Meet & Chat page.
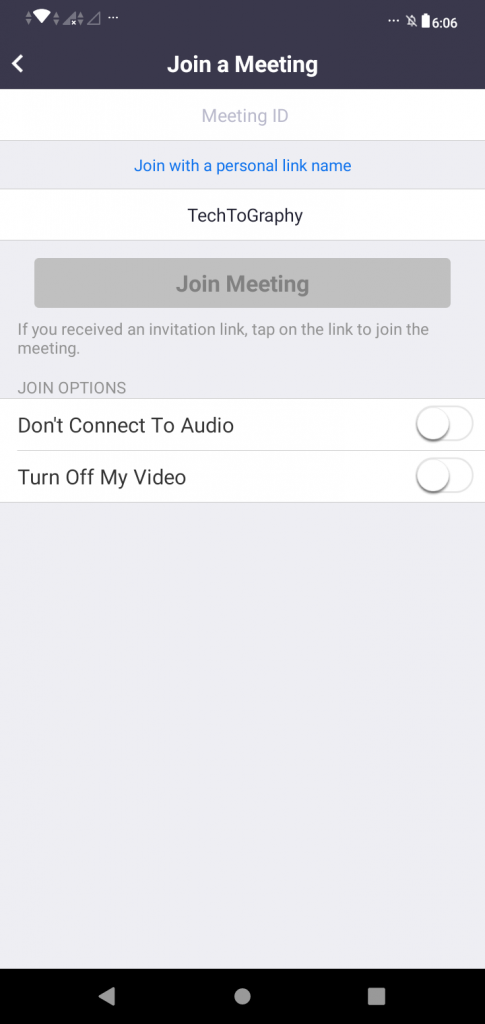
STEP 3: Enter Meeting ID
Once you’ve tapped either Join a Meeting or Join, you will be directed to the Join a Meeting page. From there, simply enter the Meeting ID.
STEP 3: Change Your Name
If you’re signed in, you can change your name by tapping your name on the screen. Note, however, that step is optional. If you prefer to use your default name, then skip this one out.
On the other hand, if you are not signed in, you will have to enter a display name. The name will either be depending on what you prefer or what will the meeting require.
STEP 5: Join Options
Below the Join Meeting icon at the Join a Meeting page, there are two Join Options which you can set before finally joining a meeting. It’s the Don’t Connect to Audio and Turn Off My Video.
These options will enable you to select whether or not you would like to connect your audio and/or video.
STEP 6: Join Meeting
Once your Name, Meeting ID, and Join Options are already set, it’s finally time to tap the Join Meeting icon. After doing so, enter the Meeting Password.
STEP 7: Leave the Meeting
Once your meeting is over, here’s how you can leave the meeting: tap Leave located at the upper right corner of your screen then tap Leave Leave Meeting.
That’s it! You already know how to join a meeting on Zoom! But hey, there’s another way to join a meeting. See the steps below.
Method 2
The second method is for when you have received an invite link rather than a Meeting ID and a Meeting Password. This one is a lot more simpler and easier to follow.
STEP 1: Tap the Invite
If you have received an invite through a messaging app or email, simply tap the link and open it with Zoom.
STEP 2: Wait at the Waiting Room
After doing so, you will then be directed to the meeting Waiting Room, wherein you will only have to wait for the meeting host to admit you or let you in.
STEP 3: Become Part of the Meeting
Once the host tapped the Admit icon from his/her screen, you will automatically be able to join or have access to the meeting as a participant.
That’s it! Easy, right?
How to Share Screen in a Meeting using an Android Device
STEP 1: You Should Be in a Meeting
Open your Zoom app and either start a news meeting or join an existing meeting.
STEP 2: Tap Share
Among the five icons on the bottom of your screen – Mute/Unmute, Start Video, Share, Participants, and More – tap Share.
STEP 3: Tap Screen
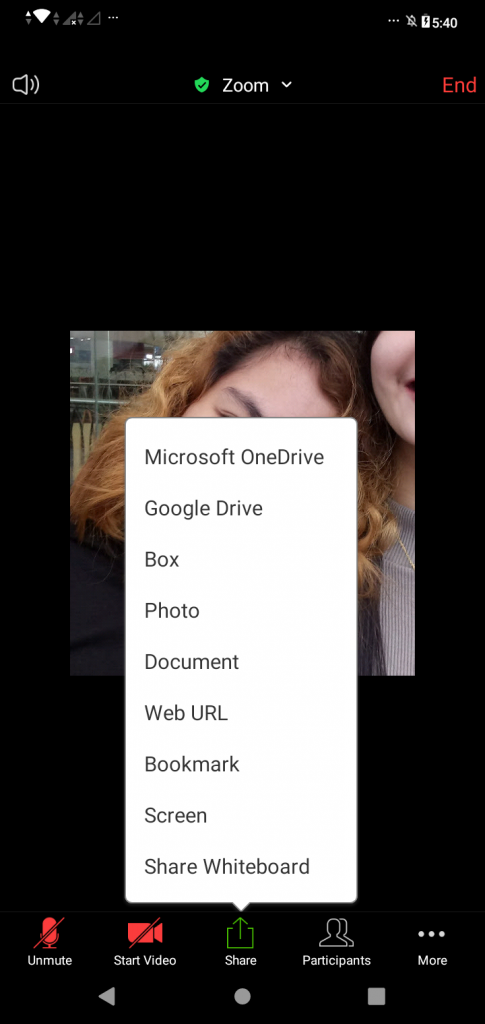
Nine more options will show up after doing so. Tap Screen the Start Now. Once you’ve selected Screen, Zoom will start capturing everything that’s displayed on your screen.
STEP 4: Stop Share
Once you’re done presenting your screen, tap the the new icon with arrow pointing right. Typically, it will appear on the lower left portion of your screen. After tapping the arrow icon, tap Stop Share.
How to Use Zoom in Computers
There’s also a need to download Zoom if you’re planning to use it on your computer. Make it your first step.
How to Get Started with Zoom using Your Computer
STEP 1: Go to Zoom Website
Go to the official website of Zoom (https://www.zoom.us/). From there, click Resources which is located at the upper right portion of your screen then select Download Zoom Client to download the perquisite.
STEP 2: Download Zoom
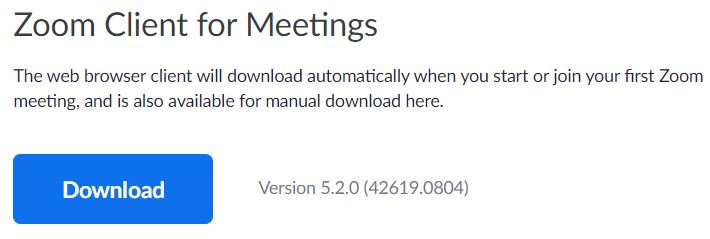
At the Download Center, click Download for Zoom Client for Meetings.
Another way to download the tool is by starting or joining your first Zoom meeting. Zoom will automatically download when you start or join your first meeting.
STEP 3: Open Zoom
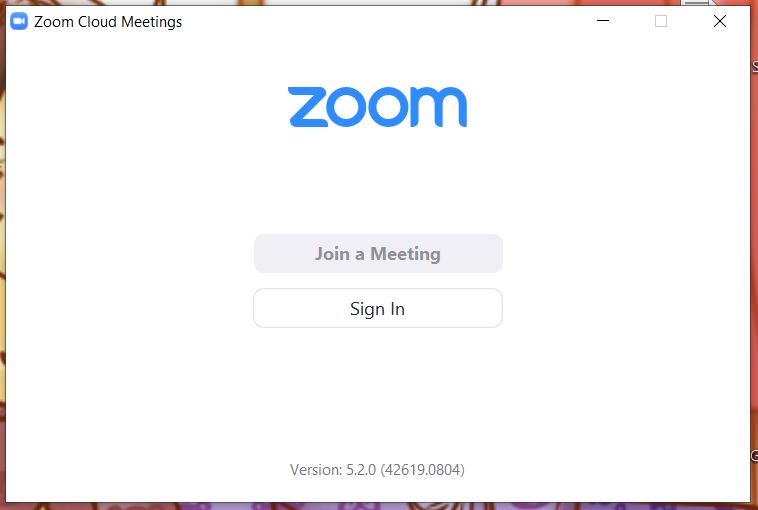
Once the tool is downloaded to your computer, open it and you’ll see the options Join a Meeting and Sign In.

Tap Sign In. If you already have an account, sign in with your account. But if you don’t, you can choose to either sign in with your SSO, Google, or even your Facebook account.
However, if you want to create an account, you have to sign up first. You can do it by tapping Sign Up Free located at the bottom right portion of the Sign In page.
How to Start Meeting using Your Computer
STEP 1: Open Zoom on Your Computer
The first thing you should do, obviously, is to launch Zoom on your computer.
Assuming that you followed the guide above and have already Signed In before, when you open Zoom on your computer you will automatically be welcomed by your Home tab.
STEP 2: Click New Meeting
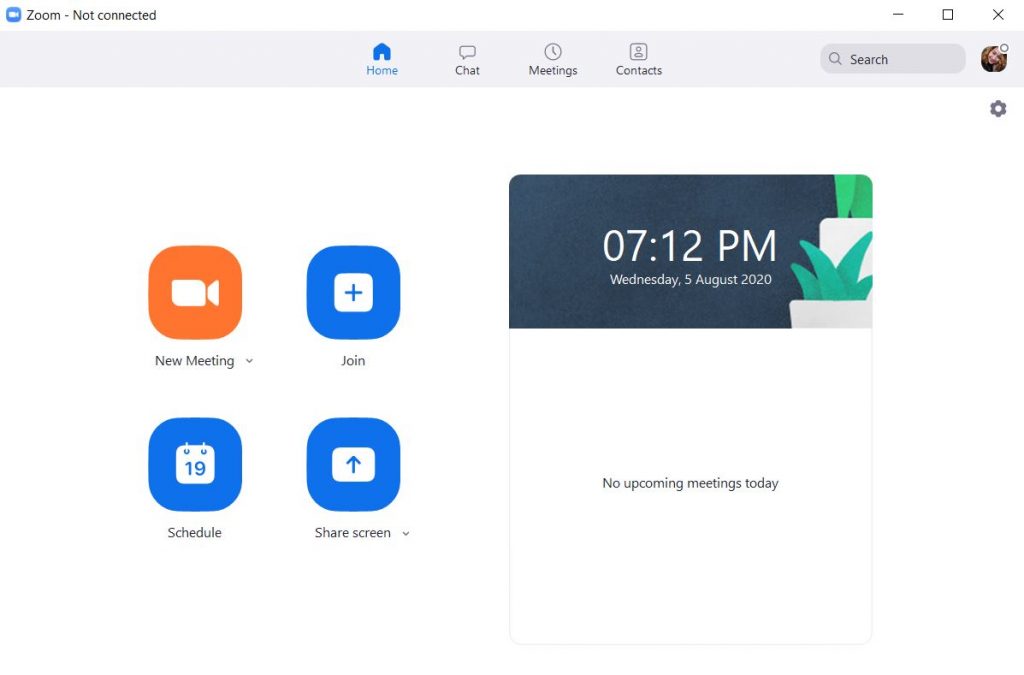
From you Home tab, select the icon that stands out – the New Meeting icon – to be able to start an instant meeting.
Once you click the New Meeting icon, a new window will appear and the video meeting will start.
STEP 3: Invite Participants
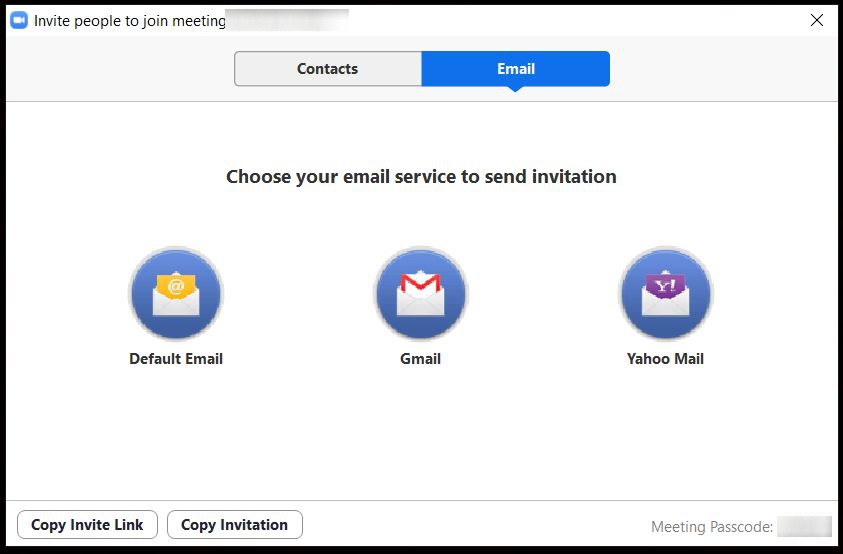
That’s how you can start a meeting, but what’s a meeting if you’re on your own, right? Pretty sure that doesn’t count as a meeting. So to be able to consider your first meeting actual meeting, invite some participants to join in.
To do so, click Participants at the bottom near center of your screen. Then click Invite located at the bottom right portion of your screen.
You will be able to choose to send invite via your contacts or email. But can just also choose to Copy Invite Link or Copy Invitation and send it to your participants using any messaging platform you prefer.
STEP 4: End Meeting
Once your meeting is over, you can end the meeting by tapping the icon at the bottom right of your screen which reads End.
Then you will be presented with two options – End Meeting for All and Leave Meeting. Since this step is for ending a meeting, select End Meeting for All. And you’re meeting is done!
How to Join a Meeting using Your Computer
STEP 1: Open Zoom on Your Computer
Simply open Zoom. If you didn’t Sign Out last time, then you are still expected to be signed in when you open the tool. Thus, expect that you will be welcomed by your Home tab.
STEP 2: Click Join or Join a Meeting
If you are still signed in alright, you can join a meeting by clicking Join. But if you are not signed in, you can join by clicking Join a Meeting instead.
STEP 3: Enter Meeting ID
To join a meeting, enter a Meeting ID or a Personal Link Name.
STEP 4: Change Your Name
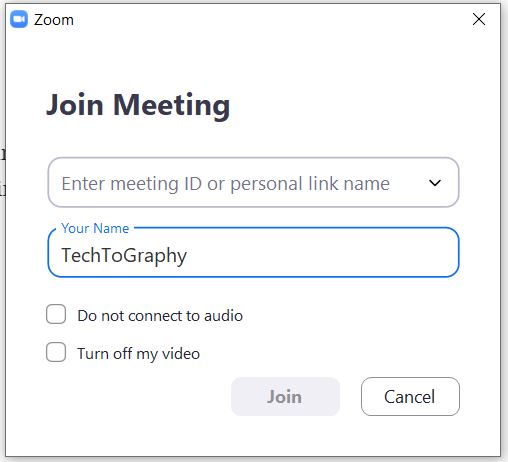
Tap your name to change it. If you think that the default name works, then don’t bother changing it anymore. But if you are not signed in, you have to enter a display name. It could be your full name or something else depending on what’s required for the meeting you’re joining in.
STEP 5: Join Options
Determine whether or not you would like to connect to audio and/or whether or not you prefer to turn off your video. You can do it by ticking the boxes corresponding your choice.
You can find these options just below your name.
STEP 6: Participate with the Meeting
Once you’re already satisfied with the name and the set Join Options, and when you have already made sure that the Meeting ID you’ve entered has no typographical error, click Join. Then enter the Meeting Password.
Available Zoom Plans
There are a total of four Zoom Meeting Plans and those are the Basic, Pro, Business, and Enterprise.
Basic Zoom Meeting Plan
Here are some of the must-know features of the Basic plan.
- For personal meeting
- It’s for free
- Host up to 100 participants
- Unlimited 1 to 1 meetings
- 40 mins limit on group meetings
- Unlimited number of meetings
- And many more…
Pro Zoom Meeting Plan
Here are some of the must-know features of the Pro plan.
- It is great for small teams
- It costs $14.99/month/host
- Lets you purchase up to 9 hosts per account
- It has all features you can find in Basic plan
- It includes 100 participants
- The limit of meeting duration is 24 hrs
- It has user management and admin feature controls
- And many more…
Business Zoom Meeting Plan
Here are some of the must-know features of the Business plan.
- It’s for small and med businesses
- Costs $19.99 /month/host
- Starting at 10 hosts for $199.9/month
- It has all the features you can find in the Pro plan
- It includes 300 participants
- You’ll have a dedicated phone support
- You’ll also have an admin dashboard
- And many more…
Enterprise Zoom Meeting Plan
Here are some of the must-know features of the Enterprise plan.
- It’s large enterprise-ready
- Costs $19.99 /month/host
- Starting at 100 hosts for $1,999/month
- It has all the features you can find in the Business plan
- This plan includes 500 participants
- It offers unlimited Cloud Storage
- And more…
Once you get the hand of using Zoom, starting with its basic features which some you can find in this blog, you may then want to upgrade to other plans such as pro or maybe enterprise.
If you want to do so, you may find more details at the website of the platform itself.
That’s How to Use Zoom
That’s how to use the video conferencing app called Zoom. Were you able to find this step-by-step guide useful? Share your thoughts with us in the comment section below.
Good luck on your future video conferences with Zoom and may it go as smoothly as possible.
For More TechToTips
Are you looking for more tips and tricks all about tech, the internet, gaming, and even photography?
You can find loads more by exploring TechToGraphy website and by liking or following our official TechToGraphy Twitter and Facebook page.
SOURCE
About Us|Zoom, Help Center|Zoom, Meetings|Zoom, Google Play|Zoom App, Business Insider, Zoom|Joining a Meeting, Download Center|Zoom, Plans and Pricing|Zoom
RELATED
How to Use Google Meet on Your Computer, Phone, or Tablet